How to Create Script to Copy Database Schema "SQL Server 2005"
Open Microsoft SQL Server Management Studio
Expand Databases > Highlight the target database thne Right click on it > Task > Generate Scripts
Follow the instruction to generate the script.
Monday, September 26, 2011
Sunday, September 25, 2011
How to install Failover Clustering and prepare it for SQL Server
How to install Failover Clustering and prepare it for SQL Server:
Prerequisites:
Prerequisites:
Storage:
Storage Area Network (SAN)
RAID Configuration:
Supports RAID 10 (1+0) for data files and RAID 1 (mirror) for log files.
Network Controller:
Two network cards.
Software:
Windows 2003 R2/2008 SP2/2008 R2 Server (Enterprise or datacenter edition).
SQL Server 2005 / 2008 / 2008 R2 (standard or enterprise edition) with the latest service pack.
Note: standard Editions support only Two Nodes.
Connect iSCSI Disks:
Start iSCSI Initiator > Quick Connect > Enter IP Address or DNS name of target then click Quick Connect then Connect.

In this topic you will find "How to configure a virtual SAN with StarWind Software": Click Here.
2. Add Feature (Failover Clustering):
Server Manager > Right click “Feature” > click Add Feature > Choose Failover Clustering > Click Next and Install.

3. Validate and Create Cluster:
Administrative Tools > Failover Cluster Manager.

a. Run validation tests to determine whether this configuration of servers and attached storage is set up correctly to support failover. And add the name or IP of servers that going to be member of this cluster then click Next then Choose “Run all tests”.

b. If the testing has completed successfully Click Finish and then Click “Create a Cluster” and again add the name or IP of servers that going to be member of this cluster, The name of the cluster and IP address that is not automatically supplied by your DHCP settings.

4. Configure the Cluster:
a. Configure Quorum Sittings:

Choose “Node and Disk Majority” to set your quorum sittings with disk witness or choose “Node and File share Majority” to set your quorum sittings with file share witness.

b. Configure Distributed Transaction Coordinator (DTC):

c. Choose Configure Distributed Transaction Coordinator (DTC) then click Next > and on Client Access Point box type Name and IP address that is not automatically supplied by your DHCP settings.

Now the Cluster must be ready to start installing SQL Server Failover Cluster.
Friday, September 23, 2011
IIS and High Availability
How to implement IIS in High Availability:
There are two methods to implement IIS in High Availability , we can use Round Robin or Network Load Balancing.
Round Robin:
Round Robin is very fast and easy way to achieve High Availability for IIS by using DNS load sharing.
The basic idea of DNS load sharing is to associate several IP addresses with a single host name. When the DNS responds to a request, it returns the whole list of addresses to the client.
So Round Robin is also simple and cost-effective to implement.
Disadvantages:
DNS has no way to detect the failure of the physical node so it will continue forward requests to the out of service node. with my own experience host will need between 2 or 3 minutes to detect this failure and get a the new DNS for the your web site.
In Round Robin there is no way to give a high speed server a higher priority because Round Robin onlt share load between node not balancing it.
Open your DNS
Start Menu > Administrative Tools > DNS
Add Alias (CNAME) and use alias name "www" and FQDN "nlb.yourdoain.local"
Add Multiple A Records to your DNS with the same name of your CNAME "nlb" and point to the "Physical Servers" that will hold your web site.


Network Load Balancing:
NLB, a clustering technology enhances the scalability and availability TCP/IP-based services.
Once the cluster is created a primary IP address is assigned, which represents a virtual IP address to which all cluster hosts respond and lets the clients access the cluster using this virtual IP address.
Note:
It is recommended that the servers have two networks.
Installing and Configuring NLB:
First we need to install Network Load Balancing Feature
Click Start Menu > Administrative Tools > Server Manager.
Right click Features section in the left-hand tree view and choose "Add Feature"
Select Network Load Balancing then Click Next and Install.
After installing Network Load Balancing we must create a CNAME and A Record in DNS as we did with Round Robin but this time we won't point the A Records to an existing servers but to a dedicated Cluster IP Address
How to create cluster:
Open Start Menu then Administrative Tools and click Network Load Balancing Manager, or run nlbmgr from a command prompt.

Right-click Network Load Balancing Clusters and click New Cluster.

.In the Host textbox write the DNS name or IP for the desired node then click Connect and choose the interface you want ot dedicate for the clustering.

Select Priority for the cluster (Lower is better).
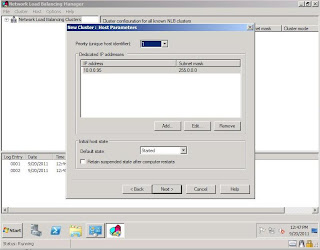
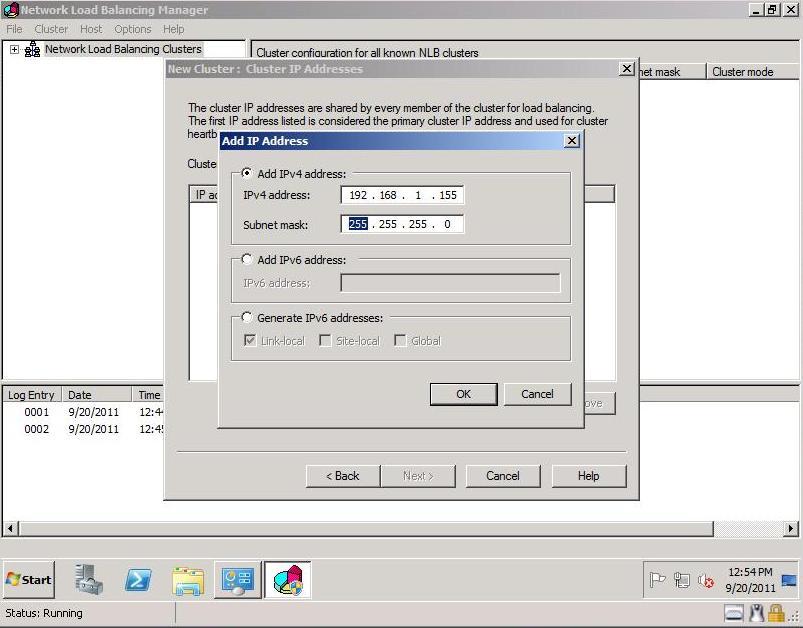
Now you must give an IP for the Cluster (write down the same IP as pre-created in DNS).

Now write down the same FQDN as pre-created in DNS
Note: in Cluster operation mode you must keep Unicast to avoid the MAC flooding or Dedicate a private VLAN to your subnet if you want to choose Multicast.

In the Port Rule Box click Edit.

In the Port Range choose From 80 to 80 then click OK and again click Edit in Port Rule Box and choose From 443 to 443 and click OK.

Now your Cluster is working fine but we need to add another node so right-click your cluster, and then click Add Host to Cluster, then you will be promoted to repeat the same steps.
Note:
If you are using a Virtual Machine on Windows 2008 R2 Hyper-V your nodes will not converge if you didn't choose "Enable spoofing of MAC addresses".

There are two methods to implement IIS in High Availability , we can use Round Robin or Network Load Balancing.
Round Robin:
Round Robin is very fast and easy way to achieve High Availability for IIS by using DNS load sharing.
The basic idea of DNS load sharing is to associate several IP addresses with a single host name. When the DNS responds to a request, it returns the whole list of addresses to the client.
So Round Robin is also simple and cost-effective to implement.
Disadvantages:
DNS has no way to detect the failure of the physical node so it will continue forward requests to the out of service node. with my own experience host will need between 2 or 3 minutes to detect this failure and get a the new DNS for the your web site.
In Round Robin there is no way to give a high speed server a higher priority because Round Robin onlt share load between node not balancing it.
Open your DNS
Start Menu > Administrative Tools > DNS
Add Alias (CNAME) and use alias name "www" and FQDN "nlb.yourdoain.local"
Add Multiple A Records to your DNS with the same name of your CNAME "nlb" and point to the "Physical Servers" that will hold your web site.


Network Load Balancing:
NLB, a clustering technology enhances the scalability and availability TCP/IP-based services.
Once the cluster is created a primary IP address is assigned, which represents a virtual IP address to which all cluster hosts respond and lets the clients access the cluster using this virtual IP address.
Note:
It is recommended that the servers have two networks.
Installing and Configuring NLB:
First we need to install Network Load Balancing Feature
Click Start Menu > Administrative Tools > Server Manager.
Right click Features section in the left-hand tree view and choose "Add Feature"
Select Network Load Balancing then Click Next and Install.
After installing Network Load Balancing we must create a CNAME and A Record in DNS as we did with Round Robin but this time we won't point the A Records to an existing servers but to a dedicated Cluster IP Address
How to create cluster:
Open Start Menu then Administrative Tools and click Network Load Balancing Manager, or run nlbmgr from a command prompt.

Right-click Network Load Balancing Clusters and click New Cluster.

.In the Host textbox write the DNS name or IP for the desired node then click Connect and choose the interface you want ot dedicate for the clustering.

Select Priority for the cluster (Lower is better).

Now you must give an IP for the Cluster (write down the same IP as pre-created in DNS).
Now write down the same FQDN as pre-created in DNS
Note: in Cluster operation mode you must keep Unicast to avoid the MAC flooding or Dedicate a private VLAN to your subnet if you want to choose Multicast.

In the Port Rule Box click Edit.

In the Port Range choose From 80 to 80 then click OK and again click Edit in Port Rule Box and choose From 443 to 443 and click OK.

Now your Cluster is working fine but we need to add another node so right-click your cluster, and then click Add Host to Cluster, then you will be promoted to repeat the same steps.
Note:
If you are using a Virtual Machine on Windows 2008 R2 Hyper-V your nodes will not converge if you didn't choose "Enable spoofing of MAC addresses".

Saturday, September 17, 2011
Domain and Forest Trusts
Domain and Forest Trusts:
Trusts is a relationship that allows users in a domain to be
authenticated and using resources in another domain.
Trust types are: External, Forest, Realm and Shourtcut.
All Trusts types can be created in one way or two way
direction.
Forest Trust and Shourtcut Trust are transitive, External
Trust is nontransitive and Realm Trust is transitive or nontransitive.
The Trust Transitivity allows the trust relationship to be
extended outside the two domains which the trust was created.
In Windows Server 2008/2008 R2 enviroment any time a child
domain in a forest is created a two way transitive trust is created by default
with the parent domain.
The two way trust means that users in domain A can access
resources in domain B and users in domain B can also access resources in domain
A.
One way trust means that in trust between domain A and
domain B, users in domain A can access resources in domain B. However, users in
Domain B cannot access resources in Domain A.
Forest Trust:
Forest Trust is created between two root domains in two
different forest .
Before creating forest trust you must ensure that your DNS
is set up properly. You can verufy your DNS using nslookup and for more info
you can read this article: http://go.microsoft.com/fwlink/?LinkId=92715
You can configure DNS conditional forwarders in each DNS
namespace or creating a secondary DNS Zone to route queries for names in the
other namespace.
External Trust:
External Trust created when you need to access recources
that located in a separate forest or when users need access to resources in a
Windows NT 4.0.
Shourtcut trust:
It used when you want to optmize the authentication process,
authentication request must pass through the domain trees. In some complex
forests it may take time for users to be authenticated. Shourtcut trust is
needed when users in domain alaways need some resources in a spacific domain
the located in another forest.
How to create Two Way Forest Trust:
Clikc Start Menu > Administrative Tools > Active
Directory Domains and Trusts.
Right-click the domain node for the domain that you want to
establish a trust with, and then click Properties.
Choose Trusts tab, click New Trust, and then click Next.

Type the DNS or NetBIOS name of the domain, then click Next.

Choose Forest trust, then
click Next.

Choose Two-way, then click Next.

Choose Both this domain and the specified domain, then click
Next.
This option to quickly create both sides of a trust by
completing a single instance of the New Trust Wizard , the administrator
running the wizard must acquire the appropriate administrative credentials for
each domain in the trust relationship.
The option “This domain only” is used when you want to
create each side of the trust separately.

Now you must type the user name and password for the
appropriate administrator in the specified domain.
On the Outgoing Trust Authentication Level--Local Forest box
choose Forest-wide authentication.

Again you must choose Forest-wide authentication.
On the Trust Selections Complete box, review the results,
and then click Next.
On the Trust Creation Complete box, review the results, and
then click Next.
On the Confirm Outgoing Trust box, click Yes, confirm the
outgoing trust and type administrative credentials from the specified domain.
On the Confirm Incoming Trust box , click Yes, confirm the
outgoing trust and type administrative credentials from the specified domain.
Now Trust relationship is created, ckick Finish.
How to configure a firewall for domains and trusts:
For Windows Server 2008/Windows Server 2008 R2
|
Client Port(s)
|
Server Port
|
Service
|
|
49152 -65535/UDP
|
123/UDP
|
W32Time
|
|
49152 -65535/TCP
|
135/TCP
|
RPC-EPMAP
|
|
49152 -65535/TCP
|
138/UDP
|
Netbios
|
|
49152 -65535/TCP
|
49152 -65535/TCP
|
RPC
|
|
49152 -65535/TCP/UDP
|
389/TCP/UDP
|
LDAP
|
|
49152 -65535/TCP
|
636/TCP
|
LDAP SSL
|
|
49152 -65535/TCP
|
3268/TCP
|
LDAP GC
|
|
49152 -65535/TCP
|
3269/TCP
|
LDAP GC SSL
|
|
53, 49152 -65535/TCP/UDP
|
53/TCP/UDP
|
DNS
|
|
49152 -65535/TCP
|
135, 49152 -65535/TCP
|
RPC DNS
|
|
49152 -65535/TCP/UDP
|
88/TCP/UDP
|
Kerberos
|
|
49152 -65535/TCP/UDP
|
445/NP-TCP/NP-UDP
|
SAM/LSA
|
For more information about Domains and Trust: http://technet.microsoft.com/en-us/library/cc736526(WS.10).aspx
Thursday, September 8, 2011
T Reviews "Comodo Firewall"
Comodo Firewall
Web Site: http://www.comodo.com/
License: Free
OS: Windows (XP/Vista/7)
Screenshot:

I have been used COMODO Firewall since 3 years with AVG Free Edition Anti Virus, my computer was very safe and I have never been worried about viruses and attacks.
COMODO offers a free firewall edition with an anti viruses included and its also free, very light and effective.
COMODO Firewall offers many feautres:
Defends your PC from Internet attacks
Control what files run on your PC
Prevents malware from being installed
Auto Sandbox Technology™
Cloud based Behaviour Analysis
Cloud based Behaviour Whitelisting
Award winning & highly rated Firewall
So its one of the best free software available on web.
The annoying feature Defense+ is keep asking you if you will allow or deny a specific installed program, very old fashion way but its fine while its totally free and gives a great security level.
Download Link: http://www.comodo.com/home/internet-security/firewall.php
Monday, September 5, 2011
SQL Server Clustering
How to Cluster SQL Server 2005:
Lab Setup:
Create a virtual machine to work as Active Directory, DNS server and SAN (DC).
Create 2 virtual nodes with 2 network card installed on each (N1 and N2).
For the DC:
Install “Windows Server 2008” then add the role “Active Directory Domain Services”.
Assign ip addr. (e.g., 192.168.1.111).
Install StarWind software and add at least 3 iSCSI disks and assign letters (S, Q, Z).
you can download a trail version from here: CLICK HERE.
and in this topic you will find a complete explanation to how to create you SAN: CLICK HERE.
For N1 and N2:
Install Windows Server 2008, join the two nodes to the domain and then initiate the 3 disks on both servers.
Also you will need to install Framework 3.5 and IIS Features.
Add “Application Server” Role and mark Incoming/Outgoing Remote Transactions.
From Server Manager click “Features” then choose Failover Clustering.

Assign ip addr. for the internal NIC on both servers (e.g., 192.168.1.112 and 192.168.1.113).
Assign ip addr. for clustering NIC on both servers (e.g., 10.0.0.112 and 10.0.0.113).
Now we are ready to begin configuring the clustering services.
First open the failover clustering console from Start Menu > Administrative Tools > Failover Cluster Management.

You will need to validate N1 and N2 configuration, if everything is green so you are ready to create your cluster (1).
Click on “Create a cluster” (2).
Click on “Create a cluster” (2).

Add N1 and N2 to the cluster
You will asked to assign a name and ip addr for the cluster (e.g., SQLCluster1 – 192.168.1.114), and add the nodes N1 and N2 to the cluster.
Now you have created a cluster and you will need to configure it.
First you will need to change the quorum configuration.
Under your cluster > More Action > Configure Cluster Quorum Settings.
Node and Disk Majority will set your quorum on one of your shared disks. Node and File Share Majoity will set your qurum on a shared file.

Choose Node and Disk Majority and assign one of your Shared Disks (e.g., Drive Q:\).

Second you will need to add Distributed Transaction Coordinator (DTC) from Services and Applications.
Expand your cluster > Right click on Services and Applicatons > Select DTC then click Next.
Type a name and assign ip addr for this services (e.g., SQLClusterDTC/192.168.1.114).
Select one of your Shared Disks (e.g., Drive Z:\).
Now you are ready to start installing SQL Server Fail Over Cluster.
First windows will be the prerequisites so click Install to start installing the prerequisites.

Then click Next

Now SQL Server Installation process will perform a System Configuration Check, if everything is ok and there is no errors click Next.

After entering license key and, Select SQL Server 2005 components to install.
Mark SQL Server Database Services and Create SQL Server Failover Cluster.

Keep the Default Instance Name and click Next.

Enter a Virtual Server Name (e.g., sqlcluster).
Note: This is the name that clients will use to connect to this instance.

Enter the virtual IP address for this instance of SQL Server 2005 (e.g., 192.168.1.115).

Select the Cluster Group as the group where you want to create the SQL Server resources, and be sure that the Data files will be created on the correct shared drive (e.g., S:\)

On the next box SQL Server will detect the others nodes in the cluster group you choosed, if you have more than two nodes and you want to exclude any node from this cluster you just select it and click remove.

Now you must provide an account (domain account) with an administrative rights on all the nodes you choosen.

In the next step you must provide Service Account which could be “Built-in System Account” or a dadicated domain account, and I prefer a deticated account for sql services.

In the next box, you must select pre-existing global domain groups, you cab choose the same group for all services or create a separate one for each services.

The next boxes are the same with the normal SQL installation, and now everything is completed and SQL Server is ready to be clustered.
Ready for Production?
Before go into Production you must TEST, TEST and TEST.
Test everything,
Manually failover nodes by turning them off,
Manually failover nodes by unplug or disable the public netwok connection,
Saturday, September 3, 2011
T Reviews "AVG Anti-Virus Free 2012"
AVG Anti-Virus Free 2012
Web Site: http://www.freeavg.com
License: Free
OS: Windows (XP/Vista/7)
Screenshot:

AVG is the most downloaded antivirus, and it’s the best for protecting your PC from
viruses.
AVG is totally free, very light and provide excellent
proection for your system, AVG also provide LinkScanner, E-Mail Protection, Anti
–RootKit and Identity Protection and its all free.
Thursday, September 1, 2011
Create virtual SAN using StarWind Software
StarWind Software:
StarWind iSCSI SAN allows you to build your own SAN for your virtual servers. Here in this topic I will take you step by step to build your own shared storage for your server.
- Download a trail version from StarWind website: http://www.starwindsoftware.com/starwind
- Install StarWind Software, and its an easy next next finish inistallation.
- Double click on the StarWind tray icon to open the StarWind management console.
- Add your local host machine as a server by clicking the icon “1”. “Add new host” windows will apear, so keep the dafault localhost ip “127.0.0.1” and the port “3261” then click ok.

- Click icon “2” to connect to your server, a login windows will appear. The default login/password: root/starwind.

- To create your own virtual device, click icon “3” or right click “Targets > Add Target”.

- Add Target wizard will appear,type your target alias.

- Choose “Hard Disk > Basic Virtual > Image File device > Create new virtual disk”.

- Click “…” to browse your disks then choose the location of your image and its size.

- Choose “Allow multiple concurent iSCSI connection (clustring)” to allow servral hosts to connect to this image concurntly.
- For the caching mode keep the default then click “Next”, then wizard will display a summary window for your setting, click “Next”, then “Finish”.
Now there is nothing to do with starwind and we will connect to this disk by using iSCSI Initiator.
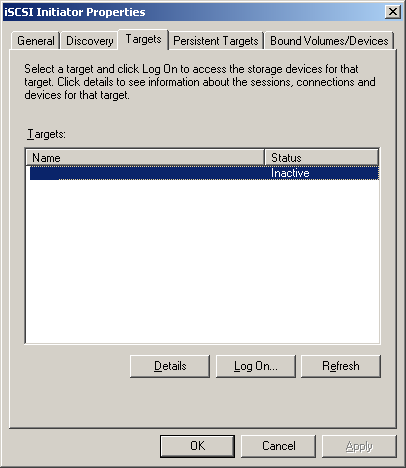
- Start iScsi Initiator “Start Menu > Admonistrative Tools > iSCSI Initiator”.

- Click Discovery tab > Add button.

- Type the ip addr of the your iSCSI array (StarWind Software machine) and keep the default port then click ok.


Note: you will need to open this port on your firewall.
- To connect to your target, click Target tab then click Log On.
- If you want your server to connect to this volume automatically when your system boots, choose the “Automatically Restore This Connection When The System Boots “ check box.

- Now everything is ok.

- you can click ok and exit the program.
One final step is needed to make your virtual SAN avaiable, you will need to initialize and format your disk, so:
- Open “Disk Management” under (Server Manager > Storage > Disk Management).
- Click it and make it online then click again to initialize it.
- Format the disk as NTFS.
Subscribe to:
Posts (Atom)