How to implement IIS in High Availability:
There are two methods to implement IIS in High Availability , we can use Round Robin or Network Load Balancing.
Round Robin:
Round Robin is very fast and easy way to achieve High Availability for IIS by using DNS load sharing.
The basic idea of DNS load sharing is to associate several IP addresses with a single host name. When the DNS responds to a request, it returns the whole list of addresses to the client.
So Round Robin is also simple and cost-effective to implement.
Disadvantages:
DNS has no way to detect the failure of the physical node so it will continue forward requests to the out of service node. with my own experience host will need between 2 or 3 minutes to detect this failure and get a the new DNS for the your web site.
In Round Robin there is no way to give a high speed server a higher priority because Round Robin onlt share load between node not balancing it.
Open your DNS
Start Menu > Administrative Tools > DNS
Add Alias (CNAME) and use alias name "www" and FQDN "nlb.yourdoain.local"
Add Multiple A Records to your DNS with the same name of your CNAME "nlb" and point to the "Physical Servers" that will hold your web site.


Network Load Balancing:
NLB, a clustering technology enhances the scalability and availability TCP/IP-based services.
Once the cluster is created a primary IP address is assigned, which represents a virtual IP address to which all cluster hosts respond and lets the clients access the cluster using this virtual IP address.
Note:
It is recommended that the servers have two networks.
Installing and Configuring NLB:
First we need to install Network Load Balancing Feature
Click Start Menu > Administrative Tools > Server Manager.
Right click Features section in the left-hand tree view and choose "Add Feature"
Select Network Load Balancing then Click Next and Install.
After installing Network Load Balancing we must create a CNAME and A Record in DNS as we did with Round Robin but this time we won't point the A Records to an existing servers but to a dedicated Cluster IP Address
How to create cluster:
Open Start Menu then Administrative Tools and click Network Load Balancing Manager, or run nlbmgr from a command prompt.

Right-click Network Load Balancing Clusters and click New Cluster.

.In the Host textbox write the DNS name or IP for the desired node then click Connect and choose the interface you want ot dedicate for the clustering.

Select Priority for the cluster (Lower is better).
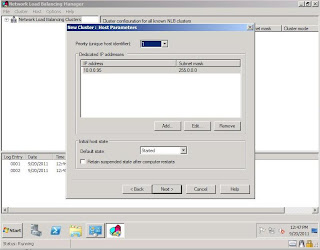
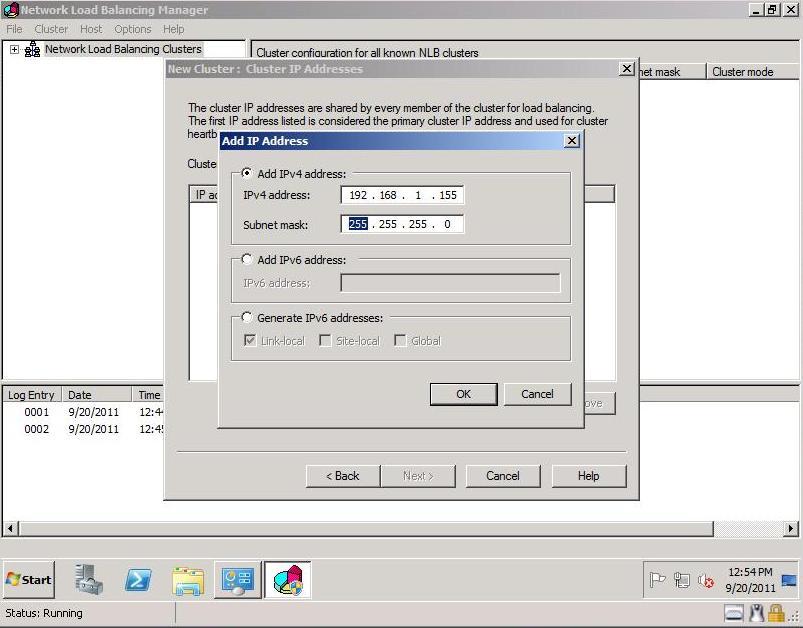
Now you must give an IP for the Cluster (write down the same IP as pre-created in DNS).

Now write down the same FQDN as pre-created in DNS
Note: in Cluster operation mode you must keep Unicast to avoid the MAC flooding or Dedicate a private VLAN to your subnet if you want to choose Multicast.

In the Port Rule Box click Edit.

In the Port Range choose From 80 to 80 then click OK and again click Edit in Port Rule Box and choose From 443 to 443 and click OK.

Now your Cluster is working fine but we need to add another node so right-click your cluster, and then click Add Host to Cluster, then you will be promoted to repeat the same steps.
Note:
If you are using a Virtual Machine on Windows 2008 R2 Hyper-V your nodes will not converge if you didn't choose "Enable spoofing of MAC addresses".

There are two methods to implement IIS in High Availability , we can use Round Robin or Network Load Balancing.
Round Robin:
Round Robin is very fast and easy way to achieve High Availability for IIS by using DNS load sharing.
The basic idea of DNS load sharing is to associate several IP addresses with a single host name. When the DNS responds to a request, it returns the whole list of addresses to the client.
So Round Robin is also simple and cost-effective to implement.
Disadvantages:
DNS has no way to detect the failure of the physical node so it will continue forward requests to the out of service node. with my own experience host will need between 2 or 3 minutes to detect this failure and get a the new DNS for the your web site.
In Round Robin there is no way to give a high speed server a higher priority because Round Robin onlt share load between node not balancing it.
Open your DNS
Start Menu > Administrative Tools > DNS
Add Alias (CNAME) and use alias name "www" and FQDN "nlb.yourdoain.local"
Add Multiple A Records to your DNS with the same name of your CNAME "nlb" and point to the "Physical Servers" that will hold your web site.


Network Load Balancing:
NLB, a clustering technology enhances the scalability and availability TCP/IP-based services.
Once the cluster is created a primary IP address is assigned, which represents a virtual IP address to which all cluster hosts respond and lets the clients access the cluster using this virtual IP address.
Note:
It is recommended that the servers have two networks.
Installing and Configuring NLB:
First we need to install Network Load Balancing Feature
Click Start Menu > Administrative Tools > Server Manager.
Right click Features section in the left-hand tree view and choose "Add Feature"
Select Network Load Balancing then Click Next and Install.
After installing Network Load Balancing we must create a CNAME and A Record in DNS as we did with Round Robin but this time we won't point the A Records to an existing servers but to a dedicated Cluster IP Address
How to create cluster:
Open Start Menu then Administrative Tools and click Network Load Balancing Manager, or run nlbmgr from a command prompt.

Right-click Network Load Balancing Clusters and click New Cluster.

.In the Host textbox write the DNS name or IP for the desired node then click Connect and choose the interface you want ot dedicate for the clustering.

Select Priority for the cluster (Lower is better).

Now you must give an IP for the Cluster (write down the same IP as pre-created in DNS).
Now write down the same FQDN as pre-created in DNS
Note: in Cluster operation mode you must keep Unicast to avoid the MAC flooding or Dedicate a private VLAN to your subnet if you want to choose Multicast.

In the Port Rule Box click Edit.

In the Port Range choose From 80 to 80 then click OK and again click Edit in Port Rule Box and choose From 443 to 443 and click OK.

Now your Cluster is working fine but we need to add another node so right-click your cluster, and then click Add Host to Cluster, then you will be promoted to repeat the same steps.
Note:
If you are using a Virtual Machine on Windows 2008 R2 Hyper-V your nodes will not converge if you didn't choose "Enable spoofing of MAC addresses".

It is quite interesting blog post worth of reading. I really thankful for an informative article like this! I really appreciate this post thank you for sharing these type of posts.
ReplyDeleteFast dedicated servers